Bringing High-Quality Image Models to Mobile: Hugging Face TIMM Meets Android & iOS


Table of Contents
🌟 Motivation
For many data scientist (including myself), we pride ourselves in training a model, seeing the loss graph go down, and claim victory when the test set accuracy reaches 99.99235%.
Why not?
This is the after all the juiciest part of the job. “Solving” one dataset after another, it may seem like anything around you can be conquered with a simple model.fit.
That was me two years ago.
The naive version of me thought that was all about it with machine learning (ML). As long as we have a dataset, ML is the way to go.
Almost nobody talked about what happens to the model after that.
Like a painting not shown in an artist’s studio, a machine learning model not deployed is a missed opportunity to enrich and enhance the lives of those it was intended to serve.
Without deployment the model you’ve trained only benefits you.
So how do we maximize the number of people you can serve with the model?
Mobile device.
It’s 2023, if you’re reading this, chances are you own a mobile device.
Hands down, having a model that can work on mobile is going to reach many.
- Accessibility - Most people carry their mobile phones with them. A model accessible on mobile devices lets users use models on the go.
- Built-in hardware - Mobile devices comes packaged with on board camera and various sensors. Not worry about integrating new hardware.
- User experience - Enables new form of interaction between apps and sensors on the phone. E.g. computer vision models can be used in an image editing app on the phone.
In this blog post, I will show you how you can make a model accessible through your mobile phone with Hugging Face and Flutter.
✅ Yes, for free.
tip
⚡ By the end of this post you will learn how to:
- Upload a state-of-the-art image classification model to Hugging Face Spaces and get an inference endpoint.
- Create a Flutter mobile app that runs on Android and iOS to call the inference endpoint.
- Display the inference results on the screen with a beautiful UI.
💡 NOTE: Code and data for this post are available on my GitHub repo here.
Demo on iOS iPhone 14 Pro
Demo on Android - Google Pixel 3 XL.
I’ve also uploaded the app to Google Playstore. Download and try it out here.
If that looks interesting, let’s start!
🤗 Hugging Face x TIMM
Making computer vision models (especially large ones) available on mobile devices sounds interesting in theory.
But in practice there are many hurdles -
- Hardware limitation - Mobile devices usually run on portable hardware with limited processing power, RAM, and battery life. Models needs to be optimized and efficient catering to these limitations.
- Optimization - To put computer vision models on mobile hardware, they usually need to be optimized to run on specific hardware and software environment on the device. This requires specialized knowledge in computer vision and mobile development.
- Practicality - User experience is a big factor in whether your app will be used by anyone. Nobody wants to use a bloated, slow and inefficient mobile app.
I know that sounds complicated. Don’t worry because we are NOT going to deal with any of that in this blog post!
Enter 👇
Hugging Face is a platform that allows users to host and share machine learning models and dataset. It’s most notable for its Transformers model for Natural Language Processing (NLP).
Recently Hugging Face has been expanding its territory beyond NLP and venturing into computer vision.
Ross Wightman, the creator of the wildly popular PyTorch Image Model (TIMM) repo joins forces.
TIMM is a open-source computer vision repo used in research and commercial application. I boasts close to a thousand (and counting) state-of-the-art PyTorch image models, pretrained weights and scripts for training, validation and inference.
TIMM joins Hugging Face.
tip
Check out the TIMM repo here.
What does it mean for you?
Now you can use any models from TIMM with Hugging Face on platforms of your choice. The Hugging Face docs shows how you can do it using Python.
📥 Hosting a Model on Hugging Face Spaces
Spaces are one of the most popular ways to share ML applications and demos with the world.
Details on the Hardware specifications and pricing here.
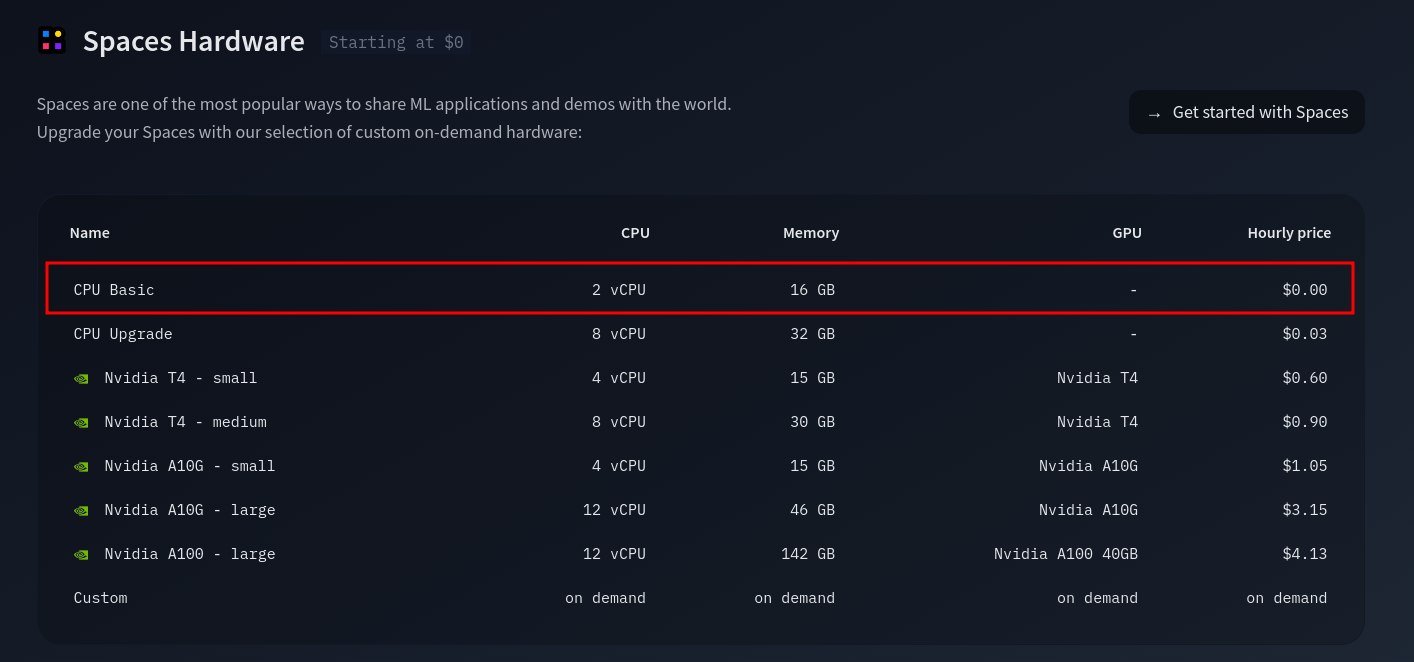
Hardware specs on Spaces.
tip
Details on how I trained the model using fastai here.
Here’s the model that I trained using Fastai ahd hosted on Hugging Face Space.
Try it out 👇
tip
View on the Hugging Face webpage here.
The inference endpoind is deployed using Gradio in just a few lines of code.
| |
If we want to use other language then we’ll need an API endpoint.
🔄 Inference API Endpoint
All applications deployed using Gradio has an API endpoint.

TIMM joins Hugging Face.
View the API endpoint here
📲 Flutter
- Build user interface.
- Don’t want to get user lost in the detail implementation.
Calling the endpoint in Flutter.
import 'dart:convert';
import 'package:http/http.dart' as http;

Future<Map> classifyRiceImage(String imageBase64) async {
  final response = await http.post(
    Uri.parse(
        'https://dnth-edgenext-paddy-disease-classifie-dc60651.hf.space/run/predict'),
    headers: <String, String>{
      'Content-Type': 'application/json; charset=UTF-8',
    },
    body: jsonEncode(<String, List<String>>{
      'data': [imageBase64]
    }),
  );

  if (response.statusCode == 200) {
    // If the server did return a 200 CREATED response,
    // then decode the image and return it.
    final classificationResult = jsonDecode(response.body)["data"][0];
    return classificationResult;
  } else {
    // If the server did not return a 200 OKAY response,
    // then throw an exception.
    throw Exception('Failed to classify image.');
  }
}
GitHub repo here.
🤖 Demo
Demo on iOS iPhone 14 Pro
Demo on Android - Google Pixel 3 XL.
Use image picker or camera.
I’ve also uploaded the app to Google Playstore. Download and try it out here.
🙏 Comments & Feedback
That’s a wrap! In this post, I’ve shown you how you can start from a model, train it, and deploy it on a mobile device for edge inference.
tip
⚡ By the end of this post you will learn how to:
- Upload a SOTA classification model to Hugging Face Spaces and get an inference endpoint.
- Create a Flutter mobile app that runs on Android and iOS to call the inference endpoint.
- Display the inference results on the screen with a beautiful UI.
💡 NOTE: Code and data for this post are available on my GitHub repo here.
I hope you’ve learned a thing or two from this blog post. If you have any questions, comments, or feedback, please leave them on the following Twitter/LinkedIn post or drop me a message.
- GitHub
- Scholar
- Telegram
🤟 Follow me
Don't want to miss any of my future content? Follow me on Twitter and LinkedIn where I share these tips in bite-size posts.
🔄 Share this post
❤️ Show some love
Creating free ML contents doesn't pay my bills. Support me in creating more free contents like these. Consider buying me a coffee. Your support means a lot to me.
